Modern Windows security features such as Credential Guard and Virtualization-based Security (VBS) rely on virtualisation technologies to ensure memory can’t be tampered with, even if an adversary is resident in Kernel memory.
It’s fairly straightforward to enable these technologies on bare metal hardware, but doing so in a virtualised test environment requires some additional configuration.
To enable VBS and credential guard in a VM, our virtual machine will need to support nested virtualisation. Nested virtualisation just means a virtual machine hypervisor is running inside a virtual machine itself.
This article will look at enabling nested virtualisation, using ProxMox VE and Linux KVM hypervisors.
The instructions below are for AMD based CPU’s. Intel CPU’s will require slightly different settings.
KVM Nested Virtualisation
When using Kernel-based Virtual Machine (KVM), first ensure nested virtualisation is enabled by examining the contents of the following file. If it’s set to 1 it’s already enabled.
user@host:~$ cat /sys/module/kvm_amd/parameters/nested
1
If not, you can load the required drivers using modprobe.
user@host:~$ sudo modprobe -r kvm_amd
user@host:~$ sudo modprobe kvm_amd nested=1
And ensure the system loads the drivers on boot by entering the following.
user@host:~$ echo "options kvm_amd nested=1" | sudo tee /etc/modprobe.d/kvm_amd.conf
options kvm_amd nested=1
Next, ensure virt-manager is installed and libvirtd is running.
sudo apt install virt-manager
sudo systemctl enable --now libvirtd
To allow standard users to interact with virtual machines, add them to the libvirt group.
sudo usermod -aG libvirt user
Next, use virt-install to configure a virtual machine with host pass through enabled.
virt-install \
--name Win2022-CredGuard \
--memory 8192 \
--vcpus 4 \
--cpu host-passthrough,+vmx \
--os-variant win2k22 \
--boot uefi,loader_secure=yes,nvram_template=/usr/share/OVMF/OVMF_VARS_4M.ms.fd \
--disk path=/var/lib/libvirt/images/Win2022-CredGuard.qcow2,size=60,format=qcow2,bus=virtio \
--disk path=/var/lib/libvirt/ISO/SERVER_2022_EVAL_x64FRE_en-us.iso,device=cdrom,bus=sata \
--disk path=/var/lib/libvirt/ISO/virtio-win.iso,device=cdrom,bus=sata \
--network network=default,model=virtio \
--graphics spice \
--video virtio \
--tpm backend.type=emulator,backend.version=2.0,model=tpm-crb
Start the operating system and install windows. You will need to reference the virtio scsi disk drivers when installing, which will be in one of the two following locations.
D:\vioscsi\w11\amd64
D:\viostor\w11\amd64
Once the operating system is up and running, install the other virtio drivers by running E:\virtio-win-gt-x64.msi, and the guest agent by running E:\virtio-win-guest-tools.exe.
With everything installed, you can then enable credential guard.
ProxMox Nested Virtualisation
This section will go over the steps needed to configure a Windows 2025 virtual machine running on a ProxMox hypervisor to enable nested virtualisation features. The instructions assume the host is using an AMD CPU.
First, check if the feature is enabled already. If the below output is set to 1, it’s already active.
root@pve:~# cat /sys/module/kvm_amd/parameters/nested
1
If it shows 0, run the following command and reboot the system.
echo "options kvm-amd nested=1" > /etc/modprobe.d/kvm-amd.conf
Next, create a virtual machine using the qm command.
qm create 104 \
  --name windows-2025 \
  --memory 8192 \
  --cores 4 \
  --sockets 1 \
  --cpu host \
  --machine q35 \
  --bios ovmf \
  --ostype win11 \
  --scsihw virtio-scsi-pci \
  --virtio0 local-lvm:48 \
  --net0 virtio,bridge=vmbr0 \
  --cdrom /var/lib/vz/template/iso/WindowsServer2025.iso \
  --ide2 /var/lib/vz/template/iso/virtio-win-0.1.271.iso,media=cdrom \
  --balloon 0
Add a TPM 2.0 module to the template.
qm set 104 --tpmstate0 local-lvm:0,version=v2.0
Then enable Secure Boot.
qm set 104 --efidisk0 local-lvm:0,efitype=4m,pre-enrolled-keys=1
Enabling Credential Guard
Use an administrative command prompt to install the Hyper-V Hypervisor feature.
Install-WindowsFeature Hyper-V -IncludeManagementTools -Restart
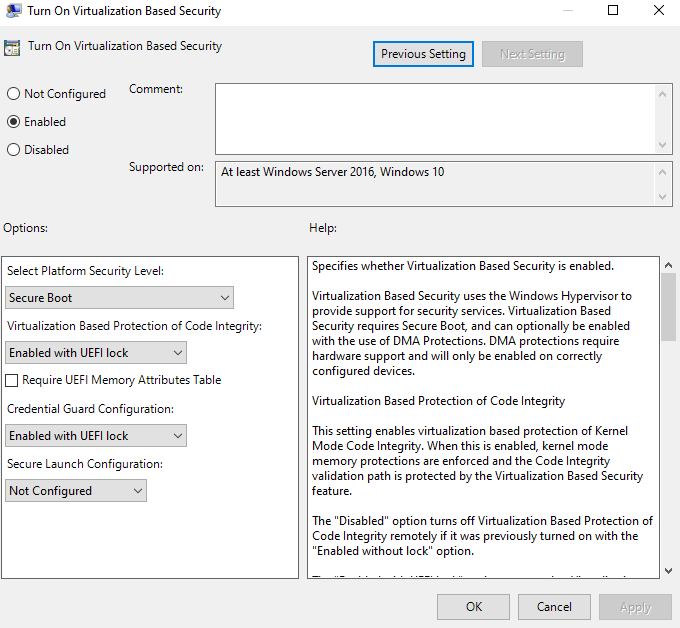
Once the feature is installed, open gpedit.msc, and navigate to “Computer Configuration > Administrative Templates > System > Device Guard”.
Enable the settings as per the below screenshot.
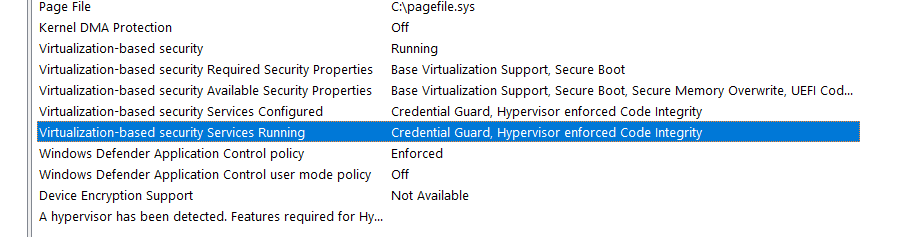
Reboot the system, and check msinfo to verify credential guard is enabled.
I also found I needed to configure the following registry key before credential guard would activate in either virtual environment.
Set-ItemProperty -Path "HKLM:\System\CurrentControlSet\Control\DeviceGuard" -Name RequireMicrosoftSignedBootChain -Value 0
In Conclusion
KVM and ProxMox are the easiest ways to get nested virtualisation working on Linux hosts. Although VirtualBox has some support for nested virtualisation, it does not support Second Level Address Translation (SLAT) pass through, so won’t work.